If you’ve noticed a downturn in the flavor of your morning cup or if your Keurig coffee machine hasn’t been performing its best lately, it might be time for a Keurig water filter replacement. Don’t worry—learning how to replace Keurig filter is not only manageable but also a crucial element of Keurig coffee machine maintenance. With this friendly guide, Keurig filter installation is about to become a straightforward task, ensuring you get to enjoy that perfect brew every time.
By following some simple steps, you’ll have fresh, delicious coffee flowing in no time. Remember that replacing the water filter is an important aspect of caring for your machine, not just for the quality of your drinks, but also to extend the lifespan of your Keurig. Let’s walk you through the process, step by step.
Key Takeaways
- Replacing your Keurig’s water filter regularly is essential for peak machine performance.
- A new filter should be soaked and rinsed before installation to activate the charcoal and remove excess particles.
- Most Keurig models recommend a filter change every two months or after 60 tank refills, whichever comes first.
- Installing the filter properly ensures that impurities in your water don’t affect the taste of your coffee.
- Frequent Keurig filter replacements can prevent scale buildup and other internal issues.
- Some Keurig machines come with a reminder feature to help you keep track of when to change your filter.
Understanding the Importance of Regular Keurig Filter Replacement
When you’re sipping on that rich, aromatic cup of coffee each morning, it’s easy to overlook the unsung hero of your Keurig coffee maker—the water filter. Making regular Keurig filter changes, however, is a pivotal step in ensuring every brew is as delightful as the first. Let’s delve into why this routine care is indispensable for enjoying the full spectrum of your coffee’s flavor, and how it simultaneously contributes to the longevity and efficiency of your Keurig machine.
Why Change Your Keurig Filter?
Simple as it may seem, the filter in your Keurig coffee maker is adept at trapping various water impurities that could otherwise mar your coffee’s taste. With time, the efficiency of the filter diminishes, necessitating a replacement to maintain your coffee’s impeccable standard. Moreover, the importance of Keurig filter change cannot be overstated; not only does it uphold the quality of your coffee, but it also prevents the accumulation of scale that can clog and corrode your machine’s intricate internal systems.
Impact on Coffee Flavor and Machine Performance
Your morning coffee should invigorate your senses, a goal which can only be achieved if your Keurig is brewing with a fresh filter. A change as simple as replacing the filter can lead to a coffee taste enhancement that revives your coffee’s original vigor. Let us not forget, caring for your Keurig encompasses every aspect of its maintenance. Regular Keurig coffee maker care includes monitoring the filter’s condition, preventing unforeseen malfunctions, and safeguarding every brew cycle you depend upon for your daily coffee ritual.
To illustrate the tangible benefits of changing your Keurig filter meticulously and on schedule, consider the table below, which compares the potential outcomes between consistent maintenance and neglect:
| Aspect | With Regular Filter Changes | Without Regular Filter Changes |
|---|---|---|
| Coffee Taste | Clean and Pure | Inconsistent or Stale |
| Machine Performance | Optimal and Efficient | Prone to Scale Buildup and Malfunctions |
| Maintenance Cost | Lower in the Long Run | Higher Due to Possible Repairs |
| Longevity of Coffee Maker | Extended | Compromised |
Maintaining the impeccable function of your Keurig coffee maker is inextricably linked to the habit of changing its filter after every 60 tank refills or bi-monthly for regular users. It’s a small action that reaps significant benefits, from exalting the aroma and flavor of your coffee to preserving the pristine condition of the machine that brews it. Embrace the ritual of Keurig coffee maker care and consistently relish in the unmatched pleasure of excellent coffee, one filter change at a time.
Identifying When It’s Time for a Keurig Filter Change
Keeping an eye on your Keurig filter replacement schedule is vital for maintaining your coffee maker’s performance and ensuring that every cup of coffee is as delicious as the last. For those wondering about the optimal brew cycles between each filter change, the answer is straightforward. Keurig advises that you replace the water filter every two months or approximately every 60 tank refills, particularly if you don’t use your coffee maker every day. This simple routine is key to a satisfying coffee experience.
If you own one of the latest Keurig models, you might find a built-in feature that notifies you when it’s time for a change—a convenient water filter reminder that helps bypass the need to circle dates on your calendar. This smart maintenance feature takes care of the timing so you can enjoy perfect brews without having to keep track manually.
- Check the filter indicator, if available, for a timely reminder
- Mark your calendar if your model doesn’t have a reminder feature
- Observe the performance and taste—if decline is noticeable, consider a filter change
Adopting these practices ensures that you are aware of when a filter change is due, helping to avoid any unwanted interference with your coffee’s quality and safeguard your machine against the accumulation of scale and other damaging impurities.

Understanding and adhering to the recommended filter replacement guidelines will significantly extend the life span of your Keurig machine and guarantee that your coffee-making ritual is always a pleasure, not a chore. Remember, timely maintenance supports the best brewing results and preserves the intrinsic flavors of your coffee.
Preparing for Your Keurig Filter Change
Embarking on the journey to replace your Keurig filter comes with a few essential steps. Proper preparation ensures that you maintain the high quality of your beloved coffee brews and extend your machine’s lifespan. Here’s how to gear up for a clean transition.
Gathering the Necessary Supplies
Equipping yourself with the right Keurig filter kit is the first step in the filter preparation process. Make sure you have a new, compatible water filter for your specific Keurig model. Alongside the filter, grab a clean glass or bowl big enough for soaking. Clear a workspace and have an empty water reservoir ready to make the process seamless.
Pre-Soaking the New Keurig Filter
Once you’ve assembled your supplies, it’s time for water filter soaking. Submerge the new filter fully into cold water, engaging the holistic absorption that activates the charcoal purification. Allow the filter to soak for approximately five minutes. In the interlude, don’t forget to rinse the lower filter holder’s mesh to tackle any residual buildup.
After soaking, take the filter and run it under cold tap water for a thorough 60-second rinse. This step is vital to eliminate any loose charcoal particles from the filter. Now, your Keurig filter is primed and ready to safeguard against impurities, ensuring that your next cup of coffee is as clean and fresh as it should be.

- Check Keurig machine compatibility
- Get a new Keurig filter kit
- Use a glass or bowl for filter soaking
- Rinse the filter and filter holder thoroughly
Remember, a little preparation goes a long way. With these steps, you’re assured that every sip of coffee not only tastes great but also comes from a well-maintained coffee machine.
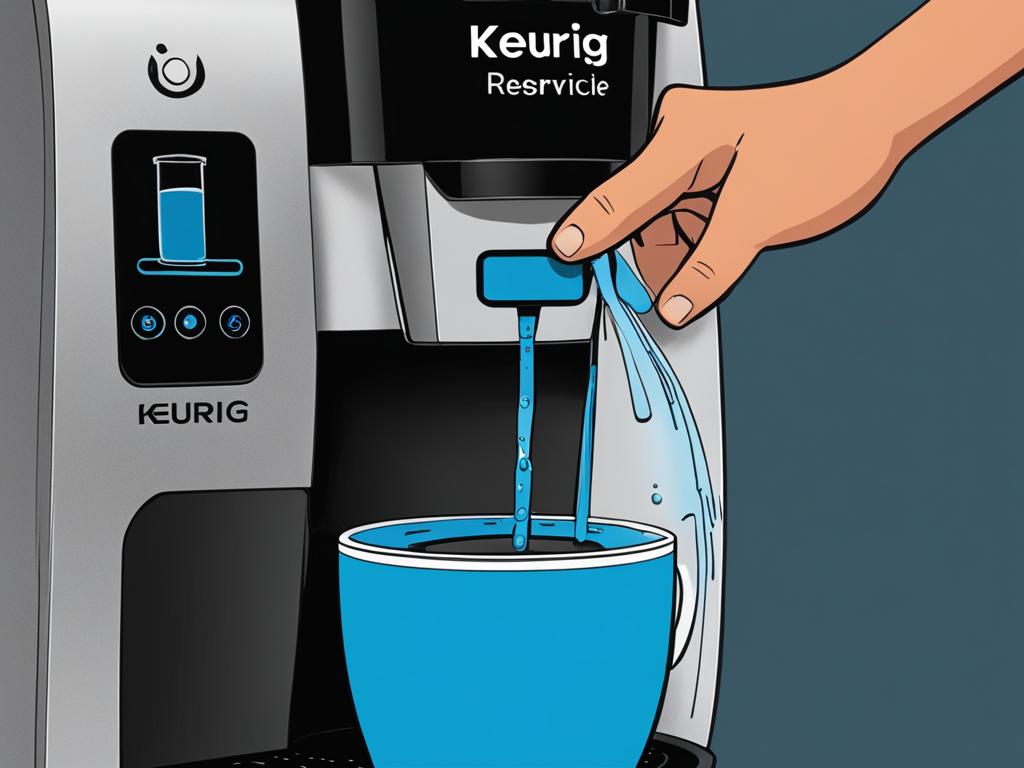
The Step-By-Step Keurig Filter Change Process
If you’re looking to keep your Keurig coffee machine operating smoothly, replacing the water filter is a crucial and easy maintenance step. Follow this simple, step-by-step Keurig filter replacement process to ensure your morning brew continues to taste fresh and delicious.
Accessing the Keurig Water Tank
Begin by accessing the Keurig water tank. Gently remove the lid from the water reservoir. This should expose the filter housing unit; grasp it firmly and wiggle it slightly if it’s held tightly within the grooves. Once it’s free, you can proceed to the next stage.

Old Filter Disposal
Open the filter holder by pinching the tabs, which will release its latch. Once opened, remove and dispose of the old filter. It’s important to handle the used filter with care to avoid spilling any accumulated contaminants.
| Step | Action | Details |
|---|---|---|
| 1 | Remove reservoir lid | Locate and lift off the lid to access filter |
| 2 | Extract filter housing | Wiggle the filter housing unit free from the grooves |
| 3 | Open filter holder | Pinch tabs and lift to access the old filter |
| 4 | Discard old filter | Dispose of the filter responsibly |
With the old filter disposed of, you’re ready to begin the installation of your new filter. Remember to soak and rinse the new filter according to the instructions on the packaging for optimal performance. Once that’s done, place the new filter back into its holder, reassemble the unit securely, and reinsert it into your Keurig water tank, pressing down until you hear a confirming click. And just like that, your Keurig is once again ready to serve up great-tasting coffee, one cup at a time.
Keurig Filter Change
Looking to ensure your Keurig continues to churn out scrumptious cups of coffee? Replacing your Keurig filter is a quick and painless task that’s integral to your Keurig filter maintenance routine. Here’s a step-by-step guide that will have you executing a quick Keurig filter swap in no time.

Begin by selecting a new Keurig filter and submerge it completely in a container filled with water. A soak duration of about five minutes is sufficient to activate the charcoal filtration properties. During this brief waiting period, address the old filter; easily remove it by lifting and pressing down on the tabs of the filter holder. This holder also houses a mesh that requires a quick rinse—removing any residual impurities that could spoil your coffee taste.
Now, take your freshly soaked filter and rinse it under running water for approximately one minute to ensure all the loose charcoal particles are whisked away. After this quick clean, you’ll be ready to snap the new filter into the holder. Next, align the holder within the water reservoir – a ‘click’ sound will signal it’s locked into place. If your model features a reminder dial, set it for the next filter change to stay on top of your coffee maker’s hygiene!
| Step | Action | Time Required | Tools Needed |
|---|---|---|---|
| 1 | Soak new Keurig filter | 5 minutes | Water container |
| 2 | Remove and discard old filter | 1-2 minutes | None |
| 3 | Rinse new filter and filter holder | 2 minutes | Clean water |
| 4 | Insert new filter into holder and place in reservoir | 1 minute | None |
| 5 | Set reminder dial (if applicable) | Less than 1 minute | None |
Always remember, a small effort in Keurig filter maintenance pays off with every delicious cup. So don’t postpone it—turn the task of replacing your Keurig filter into a regular habit and savor the rich, clean flavors of your favorite brews, cup after cup.
Rinsing and Installing the New Keurig Filter
Getting that perfect cup of coffee from your Keurig starts with a clean and effective filter. Ensuring that you correctly install a new Keurig filter is essential to this process. Follow these simple steps to rinse and install your new filter, ensuring your Keurig continues to brew quality coffee.
Thoroughly Rinsing the New Filter
After soaking your new filter, it’s essential to give it a good rinse. Aim to rinse the charcoal filter under cold running water for a solid minute to wash away any loose charcoal particles. This step is crucial for keeping your coffee tasting fresh and free of any potential residue.

Inserting the New Filter
Once you have rinsed the filter, the next step in your water filter installation is straightforward. First, place the new filter into the filter holder. Then, snap the pieces back together and ensure that everything is aligned properly as you insert the assembled filter holder back into the water reservoir of your Keurig machine. Press down until you hear a click, a small but satisfying sign that you’ve successfully installed your new Keurig filter.
| Step | Action | Key Point |
|---|---|---|
| 1 | Soak filter | Ensure the filter is fully submerged for 5 minutes to activate the charcoal. |
| 2 | Rinse filter | Rinse under cold water for 60 seconds to remove any loose charcoal. |
| 3 | Rinse filter holder | Clean out the filter holder’s mesh to remove any residue. |
| 4 | Install filter into holder | Place the filter in the holder and snap the parts firmly together. |
| 5 | Insert into water reservoir | Align and press down until the holder clicks into place. |
By focusing on the details, such as rinsing and installing your filter properly, you are not only ensuring better tasting coffee but also extending the life of your Keurig machine. Enjoy your next cup knowing it’s brewed with care and precision.
Flushing the Keurig After Filter Replacement
Having replaced your Keurig’s water filter, an important step follows to assure your coffee experience remains pristine. You need to flush your Keurig machine, which is a simple yet crucial part of post-filter change cleaning. The purpose here is clear: to eliminate any residual particles or charcoal that might taint your cup of joy. Flushing may sound technical, but it’s as easy as brewing a cup of coffee—actually, even easier, since it’s a water-only process.
Performing a Water-Only Brew Cycle
What does this involve? For starters, you execute a water-only brewing cycle. This means not using a K-cup, pod, or any coffee at all. Your Keurig should run just as normal, but only with water. It’s like giving your Keurig a “shower” on the inside. Experts recommend doing this twice—once right after installing your filter and then again, right before you brew your next coffee. This double flush is the secret to a flawless cup, unmarred by any leftover impurities from the filter change.
Here’s a quick how-to flush your Keurig:
- Power on your Keurig and fill the tank with water.
- Place a large mug where you would normally keep your coffee cup.
- Lift and lower the handle as if you were about to insert a K-cup, but do not add one.
- Select the largest brew size to maximize the flushing process.
- Press the brew button and let the Keurig work its magic.
- Dispose of the hot water that has collected in your mug.
- Repeat the process at least once more for a thorough cleaning.
A clean and well-maintained Keurig is a cornerstone for the perfect brew, and by flushing your machine after each filter change, you’re setting the stage for a great coffee experience every time. Do enjoy that next radiant cup, knowing full well your effort in water-only brewing keeps your Keurig at its peak performance.

Selecting the Right Keurig Filter for Your Model
Ensuring your morning coffee is the best it can be starts with a small but crucial detail: the water filter. When it’s time to refresh the innards of your Keurig, choosing a filter that aligns perfectly with your specific model is key. Not all filters are created equal, and each model of this beloved coffee machine has its own needs. It’s not just about securing the right fit physically—selecting the ideal Keurig filter ensures flawless functionality and peak performance, which ultimately contributes to the longevity of your machine.
Compatibility with Different Keurig Models
Whether you’re a proud owner of a model from the Keurig Duo series, Plus series, K-Supreme, K-Slim, K-Cafe, K-Elite, K-Select, K-Classic, K-Express, or K145, rest assured that there’s an appropriate filter for your machine. Just remember, size matters — Keurig Mini and K-Mini Plus models stand as exceptions in the Keurig family, bypassing the need for water filters. Keeping an eye on Keurig filter compatibility not only promotes a full-bodied, delightful coffee experience but also protects your machine from the rigors of lime and scale accumulation.
Where to Purchase Keurig Filters
When the time comes for purchasing Keurig filters, convenience is on your side. The options are plentiful—find them in multi-pack selections directly on the Keurig website, on the shelves of major retailers, or even within the vast marketplace of online retailers. With ready availability, maintaining your Keurig at peak coffee output is easier than ever. Remember to stock up on Keurig model-specific filters to keep that perfect brew flowing and your coffee routine uninterrupted.
FAQ
How often should I replace my Keurig water filter?
You should replace your Keurig water filter every two months or after 60 tank refills, especially if you use your coffee machine regularly. This ensures optimal coffee flavor and machine performance.
Why is it important to change my Keurig filter regularly?
Regularly changing your Keurig filter is crucial because it filters out impurities in the water, enhances the coffee’s taste, and prevents scale build-up which can harm your machine over time.
How do I know when it’s time to change my Keurig filter?
Change your Keurig filter every two months or after 60 tank refills. Some Keurig models have a water filter reminder feature that can help you keep track of when it’s time for a replacement.
What supplies do I need to change my Keurig filter?
For a Keurig filter change, you’ll need a new water filter compatible with your model, a glass or bowl for soaking, and access to clean water for rinsing the new filter.
How do I access the water reservoir to change my Keurig filter?
To access the water reservoir, remove its top and then pull out the filter housing unit. Depending on your Keurig model, you may need to gently wiggle the unit free from its grooves.
What should I do with my old Keurig filter?
Once you remove the old Keurig filter from the filter holder, you should discard it responsibly. Do not reuse old filters as they accumulate impurities and lose effectiveness.
How do I properly rinse the new Keurig filter?
Soak the new Keurig filter in cold water for about five minutes, then rinse it under running tap water for 60 seconds to remove any loose charcoal particles before installation.
What are the steps to install a new filter in my Keurig?
After rinsing, place the new filter into the holder, reassemble the unit, and insert it back into the water reservoir of your Keurig. Press down until it clicks into place, indicating secure placement.
Do I need to run a water-only brew cycle after changing the filter?
Yes, after installing a new filter, it’s recommended to run a water-only brew cycle without a K-cup twice to ensure any residual particles are cleared from the system.
How do I choose the correct Keurig filter for my model?
Make sure to select a water filter that is compatible with your Keurig model. Check Keurig’s website or reference your machine’s manual for the appropriate filter type. Filters are available online, at major retailers, or directly through Keurig.
Can I use any water filter in my Keurig machine?
No, you must use a filter compatible with your specific Keurig model. Not all filters fit all machines, and using the incorrect filter can lead to poor performance and potential damage.
Are there signs that my Keurig needs a filter change besides following the recommended schedule?
Besides the recommended schedule, signs that your Keurig needs a new filter include noticeable changes in coffee taste, longer brew times, or a build-up of scale visible in the water reservoir.
What should I do if my Keurig does not have a water filter reminder?
If your Keurig does not have a water filter reminder, it’s a good idea to keep track manually. Mark your calendar or set a reminder on your phone for every two months or after every 60th refill of the water tank.
Leave a Reply
You must be logged in to post a comment.